I've been busy. Amidst the hustle and bustle of my everyday life, I finished writing and creating all of the projects for my book "Creative Kids Photo Guide to Bead Crafts" and submitted it to my publisher on January 6. And then I was ready to dig into a personal project that I've had to place on the back burner for some time.
My 8-year-old and my boyfriend's 8-year-old are big-time into playing with Barbies. When I was a kid, I played with Barbies well into my tween years. In fact, my stepsister, who was 10 days younger than I, gave me her entire Barbie collection for Christmas when we were 12 because she had outgrown her interest in them...and I was in heaven! My dad had made her a simple plywood dollhouse and even some furniture pieces like a double bed. I had a lot of Barbies and doll clothes that my mom had made, and I had to be creative with furnishing my "new" doll house using fabric and odds and ends from my mom's craft supplies. Even after my interest in Barbies waned, my baby sister picked up where I left off, so all in all those Barbies and the house and makeshift furniture were quite well-loved.
Since last summer, I have been stopping at Salvation Army and scouting the toy section for Barbie doll furniture pieces in need of love. I've been browsing Pinterest for ways to make furniture that I couldn't find. And I've been digging through my crafting supplies for fabric, paint, and miscellaneous extras that could be used to accessorize a Barbie doll house...but without a house. I found a $4 Barbie cruise ship at the Salvation Army, and for months, my daughter used it as a house--opening it to its full extent and placing her furniture pieces just-so in order to create the look of a house. And then one day, I stood before a dresser that was in my kitchen that I had been using to store craft supplies--a dresser that I had already salvaged from the trash and given a new look--and I saw something I hadn't seen before. I got out my tape measure and took some measurements, and I realized that if I removed the top two drawers and the piece of wood that separated them, I essentially had enough space for two doll house rooms. I could leave the bottom drawer alone for doll storage. And if I added a level to the top, I could make a full-fledged Barbie house!
 |
| The dresser as I originally salvaged it--pre-trash |
 |
| The dresser after I painted it and replaced the knobs |
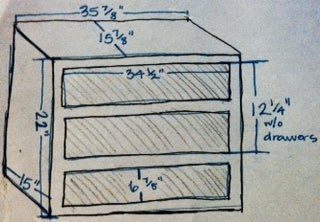 |
| My initial measurements of the dresser as I brainstormed the Barbie house |
I couldn't build this house by myself. To be honest, I really couldn't build it at all, not if I wanted something structurally sound with correct measurements. I asked my boyfriend if he would build the structure while I took care of the interior design, and here's what he did...


I couldn't wait to tackle the painting, the wall-papering, and the flooring of the house. While he worked on building the house, I planned the rooms. I selected scrapbook card stock to use as wallpaper and fabric and flooring samples for the floors. I coordinated the bits and pieces of furniture and accessories to go in each room. I set them up, took them down, reorganized, changed my mind, and finally settled on the arrangements. Believe me, I realized that my attention to detail would go unnoticed by my 8-year-old, but I had so much fun finding pieces to match each room and figuring out where to place everything that it really didn't matter to me that I was likely the only person who gave this much of a crap about the details of the house!
THE KITCHEN
I had the most fun with the kitchen. I found the main kitchen piece for $.99 at Salvation Army and a matching microwave stand for another $.99. The main kitchen piece had a light-up oven that had never been used. It was definitely a bonus! A tiny splurge from Tuesday Morning was glittery pink mosaic stickers for $1.99. I used them as a kitchen back splash. The kitchen piece was missing a sink, so I found an additional different kitchen piece (another $.99) at Salvation Army that had a sink and cut it apart and glued it to the original one I already had. Everything I had accumulated for the kitchen seemed to be in shades of pink and orange, so I settled on those colors for the kitchen after consulting with my daughter.
I found a metal candle stand to use as the base of the kitchen table ($.99), and I painted a wooden plaque that I already had for the tabletop. I used poster tube, fabric, and sample paint containers to make the matching chairs. The garbage can was a late-night ah-ha moment when I found an empty container of Take 5 gum that looked like a garbage can lid and dug around in recycling until I realized that a simple metal soda can made a great base for the garbage. I used an aerosol can lid and a battery-operated tea light to make an overhead light in the kitchen. Sticky Velcro was the secret to getting the light to stay but also being able to turn it on and off.
 |
| The completed kitchen |
 |
| The completed kitchen with the overhead and oven lights on |
 |
| Mosaic stickers I used for the back splash |
 | | |
| A candle/plant stand and painted wooden plaque for the kitchen table |
|
|
THE BATHROOM
The bathroom was my second favorite room to create. Initially, my daughter had a toilet from an old set of Barbie bathroom pieces. I found the tub for--you guessed it--$.99 at Salvation Army. Pinterest gave me the idea for a sink. I found a crystal candlestick at Salvation Army and bought a sauce dish online to use as the basin. Then, I went completely OCD to construct the faucet and knobs out of beads, wire, a spacer, and a curved tube bead. I made a wall shelf by cutting the legs off of a doll house sideboard and painting the shelf silver. I originally painted it metallic purple but was informed that it was too "girly." I crocheted a small circular rug out of sock yarn, glued a piece of mirror to a miniature picture frame from the $1 section at Michaels for a mirror above the sink, and purchased a linoleum tile for a little over a dollar for the bathroom floor (as well as the kitchen floor). The hallway floor outside of the bathroom is made with craft sticks that I glued to the floor and painted a pearly rose pink.
The chandelier was my favorite find. It is a multi-color light-up ornament that was on clearance after Christmas. I bought it for $2 at Tuesday Morning, and it hangs by Velcro in the hallway outside of the bathroom. Other than the wood embellishments I placed in each of the four corners of the doll house, the chandelier is what gives the Barbie house its ultimate dreamy look.
 |
| The completed bathroom and hallway |
 |
| The chandelier light on in the dark |
 |
| Hello fancy chandelier ornament! |
 |
| Wood embellishments |
|
THE LIVING ROOM
The living room is nothing you would expect to find in a Barbie house. I found a yellowish-green chair and a pink couch at Salvation Army. My daughter didn't want a pink living room, so we painted the couch teal and then settled on other colors in the room that would coordinate. The table is a shorter candle stand that I bought as a set with the piece I used for the kitchen table, but I used an old picture frame for the table top so that we could select card stock with a design and colors to coordinate with the rest of the room. My daughter selected the green rose wallpaper, and the rest of the room is a dark colonial blue. The painting of two hunting dogs (which is difficult to see in this photo) was something I found at an antique shop a few years ago. The floor is several pieces of charcoal gray wood flooring samples glued together. And a USB-powered floor lamp was a lucky find at CVS Pharmacy after Christmas. It was 70% off, and I paid $2 for it. It was actually almost too good to be true because it was entirely black, and I thought--who would want a tiny black USB-powered floor lamp to plug into their computer? It doesn't even give off a decent amount of light. It is totally useless except as a floor lamp for a Barbie house.
 |
| The completed living room, which could probably use a fur rug |
THE NURSERY
The idea for a baby nursery came about after I found the Fisher-Price crib for $.99 at Salvation Army. My daughter has several tiny babies (Baby in my Pocket) that are the perfect size for Barbie. We converted an old plastic Barbie desk into a changing table for the room. I chose colors and wall-covering that would also work well for a laundry room because I am currently coveting a washer/dryer/ironing board set for the house, and the nursery can double as a laundry room. But that's for another time.
 |
| The completed nursery/laundry room |
THE MASTER SUITE
Barbie's bedroom is actually not as awesome as I originally imagined it. My daughter and I planned for a pink and gold room because the bed we already had was pearly pink with a light yellow headboard. I found a white metal desk organizer to use for Barbie's closet and painted it gold, then placed decorated matchboxes on the bottom shelf as shoe boxes for some of Barbie's shoes. The dresser and mirror were a jewelry box and men's shaving mirror. I just painted the jewelry box pink and covered it in iridescent glitter paint, then painted the rim of the mirror gold. I am still figuring out how I will hang the mirror on the wall. The floor is a piece of minky fabric that I ironed onto heavy interfacing, then used basting spray to secure it to the wood floor. Just an FYI--although minky is perfect for plush Barbie carpet, it is the most awful fabric to use for any kind of craft or sewing project once you cut it with scissors. I abhor minky!! The creamy white strands of fiber were everywhere in my kitchen. As careful as I was to not make a mess, it still looked like I had been chasing a chicken around the room.
 |
| The completed master suite |
THE WHOLE ENCHILADA
The finished doll house has still more potential. We have talked about putting casters on the legs to raise it up a bit and store Barbie's Jeep and VW bug underneath. Also, Ken needs a place to go to be manly, and a "garage" would be just the ticket. The top of the doll house, for now, is being used as a back yard. I will probably buy some AstroTurf to lay down under the pool and tent that are already there. I made a fake campfire using glued-together stones and flame-colored wool roving so Barbie and her friends can enjoy some s'mores, and who knows how many more ideas will come about for the house and its exterior. One thing I am certain about, I honestly couldn't be happier with how this house turned out or more thankful for the handiwork of Mike Hoover. As I sat at my desk getting ready to blog about the house, I looked over into my daughter's room and watched her playing with her Barbies while listening to One Direction. I remember so vividly getting lost in imaginative play, and seeing my daughter have that experience is my single-most important joy upon completing this project. I treasured my own doll house, and Josephine will surely always treasure hers.

No comments:
Post a Comment